Both PyTorch and TensorFlow can utilize GPUs to train neural networks faster. To make them work, it’s important to properly set up the whole mechanics. I have done a few projects using classic machine learning methods and I also watched some tutorials and books here and there, but I never had the chance to use deep learning on a practical project. So, I’m kinda new to deep learning. Recently, I was trying to train different deep learning models for an instance segmentation task, since I had zero knowledge about how to make things work, I ended up struggling with various challenges for hours. I decided to write about the steps, tricks, and solutions for the issues I encountered. I was trying to train models on a local computer equipped with Nvidia GPUs (lambda workstation).
The Cuda toolkit is another software layer on top of the Nvidia Driver. As is mentioned on the Nvidia website, different Cuda toolkit versions are mostly forward-compatible with Cuda drivers. It means that if you already have nvidia-driver-515, which is a fairly new version, it is compatible with cuda-toolkit-11-2.
Installing Nvidia Driver
Nvidia driver is the underlying library necessary for making the operating system (In our case Ubuntu 20.04) work with the graphical processors. To install drivers you can simply run the following command in the terminal:
sudo ubuntu-drivers autoinstallor the following command in case you need a specific version:
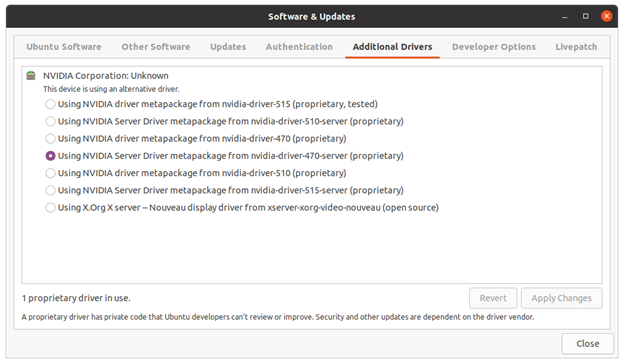
sudo apt install nvidia-driver-470it is also possible to install the drivers using Ubuntu Software Center
to verify successful installation you should run the command below:
nvidia-smi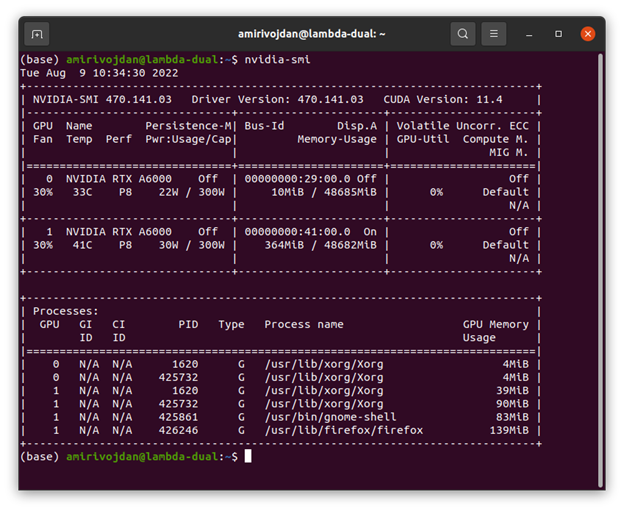
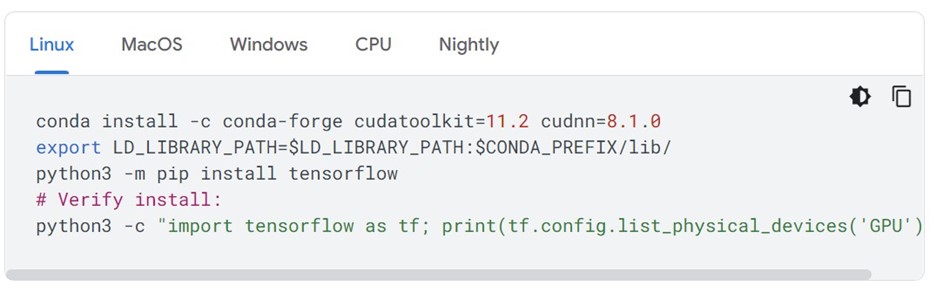
If you look at the TensorFlow installation instructions, the compatible cuda-toolkit version is mentioned in Conda install command.
To make TensorFlow work, we should install the cuda-toolkit 11.2. basically, we assume that Conda will take care of the Cuda toolkit installation, but it DOESN’T. It is necessary to install the Cuda toolkit separately on the system. We can either install the Cuda toolkit using the run file provided by Nvidia or install it using an apt command.
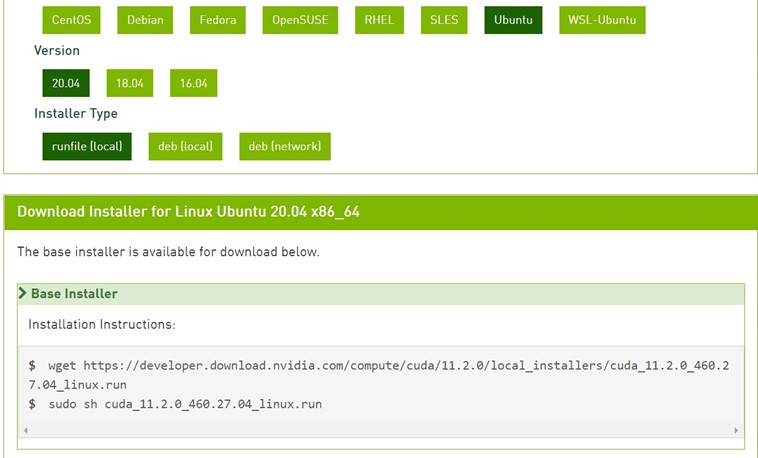
wget https://developer.download.nvidia.com/compute/cuda/11.2.0/local_installers/cuda_11.2.0_460.27.04_linux.run
sudo sh cuda_11.2.0_460.27.04_linux.run
Apt installation:
sudo apt install nvidia-cuda-toolkit-11-2Note: it is necessary to set the Cuda toolkit path to environment variables to make TensorFlow and PyTorch able to find libraries and tools. you can add the following commands to your ~/.bashrc to pick the Cuda toolkit automatically in every new bash.
export CUDA_HOME=/usr/local/cuda
export PATH=/usr/local/cuda/bin:$PATH
export CPATH=/usr/local/cuda/include:$CPATH
export LIBRARY_PATH=/usr/local/cuda/lib64:$LIBRARY_PATH
export LD_LIBRARY_PATH=/usr/local/cuda/lib64:/usr/local/cuda/extras/CUPTI/lib64:$LD_LIBRARY_PATH
To verify the cuda toolkit installation you should run:
nvcc --version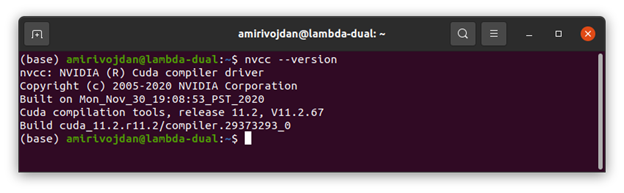
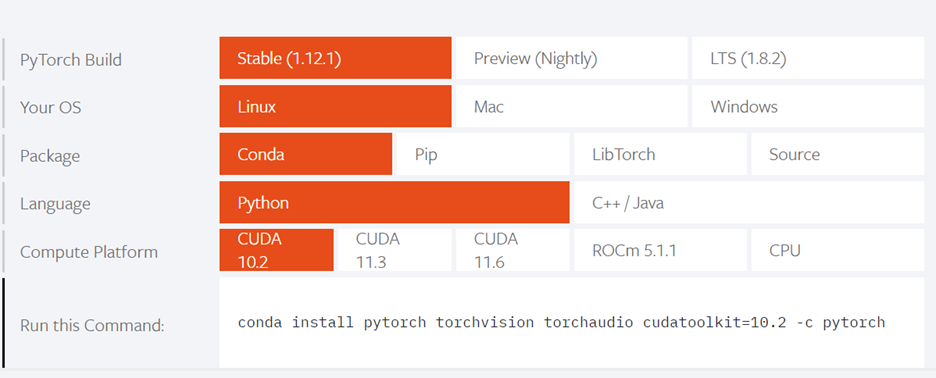
Setting up PyTorch(GPU):
As it is provided by the PyTorch website, it’s possible to set up different versions of PyTorch using Conda. It is supporting the Cuda toolkit 10.7, 11.3, and 11.6.
Note that any other versions of the Cuda toolkit will not work with PyTorch, so make sure the installed version of the cuda toolkit is among the versions mentioned in PyTorch installation instructions!
Setting up TensorFlow(GPU):
After setting up the Cuda driver and toolkit, we are ready to install TensorFlow using the commands below:
conda install -c conda-forge cudatoolkit=11.2 cudnn=8.1.0
export LD_LIBRARY_PATH=$LD_LIBRARY_PATH:$CONDA_PREFIX/lib/
python3 -m pip install tensorflow
# Verify install:
python3 -c "import tensorflow as tf; print(tf.config.list_physical_devices('GPU'))"
Note that before using TensorFlow, each time a new terminal is opened, it is necessary to define the Cuda toolkit path in the environment with the command below. It is also possible to add the Cuda toolkit path permanently using the commands below,
mkdir -p $CONDA_PREFIX/etc/conda/activate.d
echo 'export LD_LIBRARY_PATH=$LD_LIBRARY_PATH:$CONDA_PREFIX/lib/' > $CONDA_PREFIX/etc/conda/activate.d/env_vars.sh
This way Conda will automatically load the cuda toolkit path each time activating an environment.
Setting up TensorFlow(GPU) with Docker:
One way to avoid problems with the cuda-toolkit and also a way to be able to use different versions of TensorFlow is running Tensorflow docker containers which DIRECTLYinteract with the Cuda driver. There are different containers of TensorFlow each integrated with Jupiter lab. After running the container, TensorFlow will be accessible through Jupyter lab.
after installing Docker you should install nvidia-docker2 using the following command:
sudo apt-get install -y nvidia-docker2pull the TensorFlow(bundled with Jupyterlab) container:
docker pull tensorflow/tensorflow:latest-gpu-jupyterthen run the container and access Jupyter lab through your browser:
docker run --gpus all -it -p 8888:8888 tensorflow/tensorflow:latest-gpu-jupytermake sure to add the –gpus all flag to the command to give docker access to GPUs. you can then access the jupyter notebook through http://yourip:8888/ (use localhost if you are running it on a local computer). Also, you can add –restart unless-stopped flag to make the docker container run after each restart(unless stopped manually).
docker run --restart unless-stopped --gpus all -it -p 8888:8888 tensorflow/tensorflow:latest-gpu-jupyterTo verify if GPU devices are available in TensorFlow run the following code in a jupyter notebook cell
import tensorflow as tf
print(tf.config.list_physical_devices('GPU'))
Leave a Reply