During the past few weeks I was working on a project to detect an object from two or more cameras mounted in different perspectives. The initial intuitive idea is to save images with a timestamp and then match the images with a time interval of less than a defined threshold.
Accordingly, I have written a piece of code which simply captures images from camera using OpenCv python library an save them in a specified directory as follows.
At first we have to create an environment and install opencv-python lib:
pip install opencv-pythonThen a video capture is created with the camera index=0 and the desired input image size is defined camera object set function. Note if you have multiple cameras you should specify the the index for each one.
import cv2 as cv
from datetime import datetime

camera_id = 0
camera = cv.VideoCapture(camera_id)
camera.set(cv.CAP_PROP_FRAME_WIDTH, 1280)
camera.set(cv.CAP_PROP_FRAME_HEIGHT, 720)
Then, all we need is calling the opencv read() function in a loop and save the captured image in the specified directory.
directory = "./images/"
while True:
    result, image = camera.read()
    if result:
        timestamp = datetime.now().strftime('%Y_%m_%d_%H_%M_%S.%f')[:-3]
        cv.imwrite(f"{directory}{timestamp}.jpg", image)
    cv.waitKey(1)
To measure the recording FPS we can also use the cv.getTickCount() function to get the current CPU tick and call it again at the buttom of the loop and find the time interval and then devide the interval by the CPU frequency to get the time interval in seconds. Finally divide the number of elapsed seconds by the number of frames captured to have the actual FPS. The final code is as follows:
import cv2 as cv
from datetime import datetime

camera_id = 0
camera = cv.VideoCapture(camera_id)
camera.set(cv.CAP_PROP_FRAME_WIDTH, 1280)
camera.set(cv.CAP_PROP_FRAME_HEIGHT, 720)

start_tick = cv.getTickCount()
numberofframes = 0

directory = "./images/"
while True:
    result, image = camera.read()
    if result:
        timestamp = datetime.now().strftime('%Y_%m_%d_%H_%M_%S.%f')[:-3]
        cv.imwrite(f"{directory}{timestamp}.jpg", image)
        numberofframes+=1

    end_tick = cv.getTickCount()
    time_taken = (end_tick - start_tick) / cv.getTickFrequency()
    fps  = numberofframes / time_taken
    print(fps)
    cv.waitKey(1)
Sounds good! But due to an unknown reason the recording speed did not exceed 12 frames per second, which does not seem to be right. Therefor, I decided to dig deeper to find a way to increase opencv python low recording FPS. At first I was spectical about the opencv python wrapper itself. I mean it’s python, and it is well-established that it is not as fast as C++ (However it is using native opencv library implementation in the underlying layers).
By the way, I decided to try FFMPEG, which is the swiss army knife of the multimedia related operations, to record images with time-stamps and also verify if the problem is related to the opencv python not anything else.
Recoding Time-Stamped Images with FFMPEG
At first, download the FFMPEG command line tool excutable, and add its address to the enviroment variables to make it easily accessible.
Then use the command below to have a list of connected devices:
ffmpeg -list_devices true -f dshow -i dummy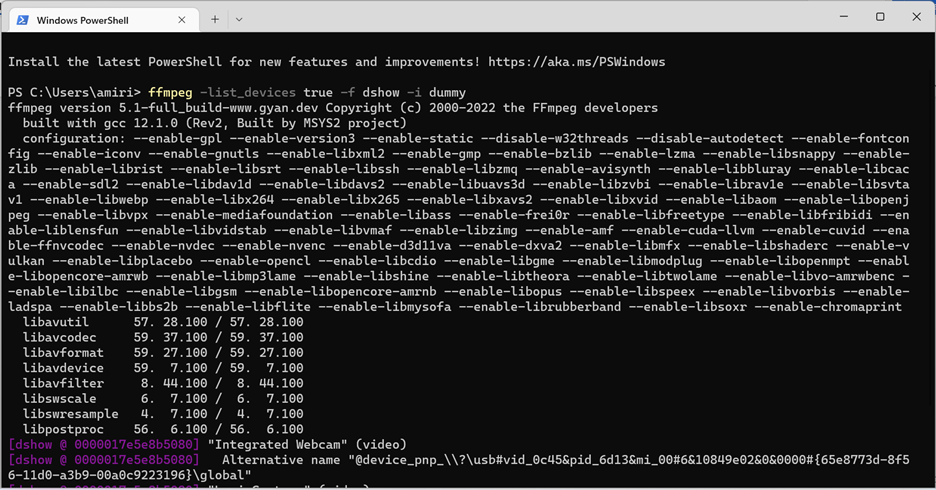
FFMPEG, based on the operating system it runs on, offers its users several different libraries for hanling different operations. One of them which is deprecated on windows based on the documentation is the vfw library. We can record videos using this library as below:
ffmpeg -y -f vfwcap -r 30 -i 0 out.mp4This command will record an .mp4 file from the camera with id=0 with 30 frames per second. As shown in figure below the maximum FPS it could reach was about 15 frames per second which is almost the same as OpenCv.
The second and updated version is to say FFMPEG to use Microsoft built-in library for media communications called DirectShow.
ffmpeg.exe -f dshow -video_size 1280x720 -t 00:00:30 -i video="Integrated Webcam" out.mp4This command is telling FFMPEG to record a 30 seconds 1280×720 video from the device with name “Integrated Webcam” using the DirectShow library.
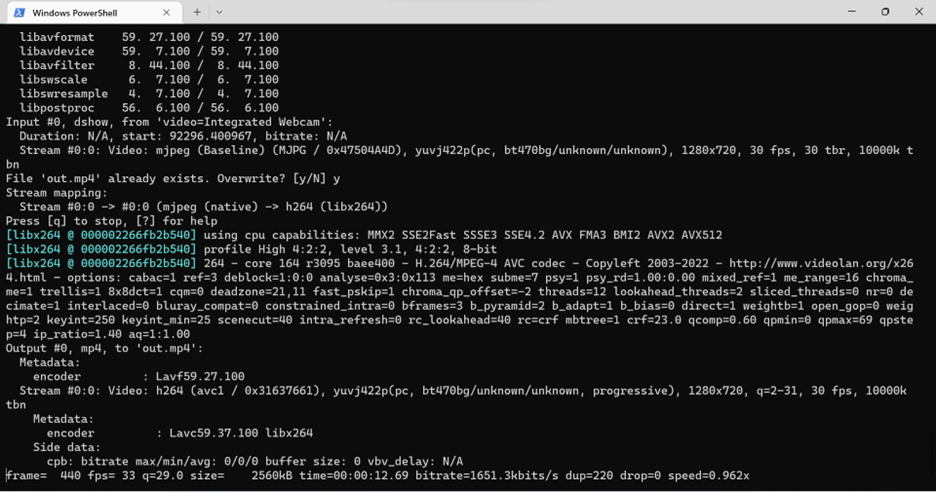
Recording video using DirectShow increased fps to roughly 30 frames per second. It seems that FFMPEG coupled with DirectShow is fast enough in recording video streams.
Great! Now, we should try to save time-stamped images to be able to perform the image synchronization process. It is possible to record images with FFMPEG using the following command:
ffmpeg.exe -f dshow -video_size 1280x720 -t 00:00:59 -i video="Integrated Webcam" '%04d.png'With this command FFMPEG will record images and save them as digital number file names which is not useful in our image synchronizing case.
To save images with timestamp file name, FFMPEG provides the STRFTIME library. We just need to add the arugument -strftime 1 in the command followed by the datetime format string.
ffmpeg.exe -f dshow -video_size 1280x720 -t 00:00:59 -i video="Integrated Webcam" -strftime 1 '%Y-%m-%d_%H-%M-%S_test.png'Unfortunately, STRFTIME library does not provide milliseconds precision which is not possible to be used in our project.
Fixing OpenCv-Python Low Recording Rate
At least, we have a clue! We have seen that leveraging DirectShow library would help us increase the recording rate with FFMPEG. After looking OpenCv documention, I have found that it is possible to use different libraries(so called backends) for I/O operations. The problem is, OpenCv is not contained DirectShow by default which means that we have to compile it from the source code with DirectShow included to be able to use it as the backend.
Ok then, let’s compile OpenCv form source code. I will briefly go through the steps:
- Make sure you have Visual Studio Community and CMAKE installed.
- Download the latest OpenCV release source code.
- Extract the .zip file.
- Launch cmake-Gui and provide it the source code folder path and the build destination path.
- press configure and select the visual studio version(the one you just installed) you wish the project generate for.
- go through the list of red checkboxes and make sure check whatever feature you need. In our case we have to check OPENCV_PYTHON3_VERSION, BUILD_opencv_python3 and WITH_DSHOW flags.
- It will automatically find python binaries if you already installed them, otherwise make sure you have provided python binary files. Note that you can download and provide the contrib extra modules if you need any of those libraries and functionalies.
- press generate and wait for the OpenCV visual studio solution to get generated.
- press open project or open the .sln file generated in the destination path.
- In the opened solution select build type as release , open CmakeTargets, right click on ALL-BUILD. (Recharge with a coffee since it might take a while to build)
- right click on INSTALL and built it too.
- opencv-python should be installed automatically. Otherwise you can find the opencv-python library with .pyd extension in the build path /lib/python3 directory and put a copy of it inside your python environment packages directory.
Python Offline Image Synchronization
Let’s see if we can gain higher FPS with capturing time-stamped images.
import cv2 as cv
from datetime import datetime

camera_id = 0
camera = cv.VideoCapture(camera_id)
camera.set(cv.CAP_PROP_FRAME_WIDTH, 1280)
camera.set(cv.CAP_PROP_FRAME_HEIGHT, 720)

start_tick = cv.getTickCount()
numberofframes = 0

directory = "./images/"
while True:
    result, image = camera.read()
    if result:
        timestamp = datetime.now().strftime('%Y_%m_%d_%H_%M_%S.%f')[:-3]
        cv.imwrite(f"{directory}{timestamp}.jpg", image)
        numberofframes+=1

    end_tick = cv.getTickCount()
    time_taken = (end_tick - start_tick) / cv.getTickFrequency()
    fps  = numberofframes / time_taken
    print(fps)
    cv.waitKey(1)
29.558924959655464
29.568654656146848
29.573374653446777
29.548251172473567Great! We could reach about 30 frames per second.
Now let’s get back to the main objective, capturing time-stamped images! The code provided above is naive and it was only for testing the output FPS. Therefor, I have added the functionalities we need and wrapped up the entire code in a class for ease of use and further development.
from itertools import count
from threading import Thread, Semaphore
import numpy as np
import cv2 as cv
import time
import random
from datetime import datetime
import os

class Camera(Thread):

    def __init__(self, camId:int, frameWidth:int, frameHeight:int,visualize:bool = False, video_output:bool = False, time_stamped_output:bool = False, root_path:str="",fileName:str="",fileName_postfix:str="", autofocus:bool=False):

        Thread.__init__(self)

        self.camId = camId
        self.width = frameWidth
        self.height = frameHeight
        self.outputfile = fileName
        self.fileName_postfix = fileName_postfix
        self.done = False
        self.image_format = '.jpeg'
        self.autofocus = autofocus
        self.fourcc =  cv.VideoWriter.fourcc('M','J','P','G')
        self.calibration_frames_number = 200
        self.time_stamped_output = time_stamped_output
        self.video_output = video_output
        self.root_path = root_path

        if not self.outputfile:
            self.outputfile = self.get_time_stamp()+"_cam"+str(self.camId)+self.fileName_postfix+".mp4"

        self.visualize = visualize

    def connect(self):
        # make sure build and install opencv from source to work with DirectShow on windows
        self.videostreamcapture = cv.VideoCapture(self.camId, cv.CAP_DSHOW)
        self.input_fps  = self.videostreamcapture.get(cv.CAP_PROP_FPS)
        self.recording_fps = self.input_fps

        self.videostreamcapture.set(cv.CAP_PROP_FRAME_WIDTH, self.width)
        self.videostreamcapture.set(cv.CAP_PROP_FRAME_HEIGHT, self.height)

        if not self.autofocus:
            self.videostreamcapture.set(cv.CAP_PROP_AUTOFOCUS, 0) # turn the autofocus off
        else:
            self.videostreamcapture.set(cv.CAP_PROP_AUTOFOCUS, 1) # turn the autofocus on


    def calculate_camera_fps(self)->int:

        start_tick = cv.getTickCount()
        for i in range(0, self.calibration_frames_number) :
            ret, frame = self.videostreamcapture.read()
        end_tick = cv.getTickCount()
        time_taken = (end_tick - start_tick) / cv.getTickFrequency()
        fps  = self.calibration_frames_number / time_taken
        return fps

    def calculate_recording_fps(self)->int:

        outputstreamwriter = cv.VideoWriter(self.root_path+self.get_time_stamp()+"_calibration_"+str(self.camId)+self.fileName_postfix+".mp4",  self.fourcc, 30, (self.width, self.height), isColor=True)
        start_tick = cv.getTickCount()
        for i in range(0, self.calibration_frames_number) :
            ret, frame = self.videostreamcapture.read()
            outputstreamwriter.write(frame)
            cv.waitKey(1)
        end_tick = cv.getTickCount()
        time_taken = (end_tick - start_tick) / cv.getTickFrequency()
        fps  = self.calibration_frames_number / time_taken
        outputstreamwriter.release()
        return fps

    def get_time_stamp(self):
        timestamp = datetime.now().strftime('%Y_%m_%d_%H_%M_%S.%f')[:-3]
        return timestamp

    def run(self):

        camera_fps = self.calculate_camera_fps()
        print("camera fps: " + str(camera_fps))

        if self.time_stamped_output:
            date_path=self.root_path + datetime.now().strftime('%Y-%m-%d')
            if not os.path.exists(date_path):
                os.mkdir(date_path)

        if self.video_output:
            recording_fps = self.calculate_recording_fps()
            print("recording fps: " + str(recording_fps))
            self.outputstreamwriter = cv.VideoWriter(self.root_path + self.outputfile, self.fourcc, recording_fps, (self.width, self.height), isColor=True)

        while not self.done:
            ret, frame = self.videostreamcapture.read()
            if not ret:
                print("Can't receive frame (stream end?). Exiting ...")
                break

            if self.time_stamped_output:
                timestamp = self.get_time_stamp()
                cv.imwrite(date_path + "/" + timestamp +"_"+str(cv.getTickCount())+"_"+ "cam" +str(self.camId)+self.fileName_postfix+ self.image_format, frame)

            if self.video_output:
                self.outputstreamwriter.write(frame)

            if self.visualize:
                cv.imshow('Camera Index:'+ str(self.camId), frame)

            cv.waitKey(1)

        self.videostreamcapture.release()
        if self.video_output:
            self.outputstreamwriter.release()
        cv.destroyAllWindows()

    def stopit(self):
        self.done = True
First of all, note that this class is supposed to be general class for camera operations, including capturing timestamped image. To avoid any delay or performance issues while recording with several cameras, each camera I/O should run in a seperate thread. Accordingly, the Camera class is derived from the thread class. To have some info about the actual FPS I have implemented two functions to capture a few frames and calcluate FPS both in recording mode and only capturing mode. This info could be used when we are directly recording video files. The construcor function provides several options as follows.
def __init__(self, camId:int, frameWidth:int, frameHeight:int,visualize:bool = False, video_output:bool = False, time_stamped_output:bool = False, root_path:str="",fileName:str="",fileName_postfix:str="", autofocus:bool=False):- camID: Each camera object should be assigned with an ID, and the ID is used for saving recorded files.
- frameWidth and frameHeight: Size of frames to capture.
- visualize: Shows the live camera output if True
- video_output: Saves a .mp4 video output if True
- time_stamped_output: Record time-stampped images if True
- root_path: Output root path
- fileName: File name for video recordings
- fileName_postfix: File name postfix string
- autofocus: Turn Autofocus on/off
Leave a Reply